Battery switch on travel trailer function is crucial for managing your RV’s power. Understanding how your battery switch works – whether it’s a single, dual, or selector switch – is key to avoiding dead batteries and electrical problems. This guide will walk you through different switch types, their locations, safe operation, troubleshooting tips, and essential maintenance, empowering you to keep your travel trailer running smoothly.
We’ll cover everything from identifying your switch’s location and performing pre-operation checks to understanding how it interacts with other electrical components like your converter and inverter. We’ll even tackle common issues like no power or incorrect switching, providing clear solutions and preventative maintenance strategies.
Battery Switch Types in Travel Trailers
Choosing the right battery switch for your travel trailer is crucial for managing your power sources effectively. This decision impacts how you charge your batteries, use your appliances, and prevent accidental drain. Understanding the different types available helps you make an informed choice based on your needs and budget.
Single Battery Switch
A single battery switch is the simplest type. It’s a basic on/off switch that controls power to the trailer’s 12-volt system from a single battery.
| Switch Type | Description/Diagram |
|---|---|
| Single Battery Switch | Imagine a simple light switch. Power from the battery flows to the trailer’s electrical system when the switch is “on.” A single wire connects the battery to the switch, and another wire runs from the switch to the trailer’s electrical panel. When the switch is off, the circuit is broken, preventing power flow. |
This type is inexpensive and easy to install, but only suitable for trailers with one battery. Its primary advantage is simplicity; its disadvantage is its lack of flexibility for managing multiple batteries.
Dual Battery Switch
A dual battery switch allows you to select which battery (or both) powers the trailer’s 12-volt system. This offers greater control and flexibility.
| Switch Type | Description/Diagram |
|---|---|
| Dual Battery Switch | Think of a three-position switch: “Battery 1,” “Battery 2,” and “Both.” Each position connects the selected battery (or both) to the trailer’s electrical system. Internally, this switch uses a series of contacts that are mechanically moved to connect the desired battery or batteries. It’s essentially two single-pole, double-throw switches combined into one unit. |
Dual battery switches provide the advantage of being able to choose which battery powers the trailer, allowing for more efficient battery management. For example, you can use one battery for house functions and the other for starting your tow vehicle. However, they are slightly more expensive than single switches.
Selector Switch (Multi-Battery Switch)
A selector switch, also known as a multi-battery switch, extends the functionality of a dual battery switch to accommodate more than two batteries. These switches typically offer more positions, allowing you to isolate batteries or combine power sources.
| Switch Type | Description/Diagram |
|---|---|
| Selector Switch (Multi-Battery Switch) | These switches can have several positions, often including options for individual battery selection, combinations of batteries, and an “off” position. Internally, they’re more complex than dual switches, using multiple contact points to route power as needed. Think of it as an extension of the dual battery switch concept, with more choices and more internal complexity. |
The advantage is superior flexibility in managing multiple batteries, ideal for larger trailers or those with specialized power needs. The disadvantage is increased complexity and cost. They are more expensive and require more advanced wiring knowledge for installation.
Battery Switch Location and Accessibility
Finding your travel trailer’s battery switch is crucial for both routine maintenance and emergency situations. A readily accessible switch allows you to quickly disconnect the battery, preventing accidental drain or mitigating risks in case of a short circuit or fire. Knowing its location saves valuable time and potentially prevents costly repairs.Knowing where your battery switch is located is essential for safe and efficient RV operation.
Easy access is critical for regular battery checks, disconnection during storage, and addressing potential electrical issues. A poorly placed switch can complicate even simple maintenance tasks and delay responses during emergencies.
Typical Battery Switch Locations
Battery switches in travel trailers are often found in a few common locations. They might be located inside a dedicated compartment near the batteries themselves, usually under the trailer’s exterior, or sometimes within a more accessible internal compartment like a storage bay or even near the main electrical panel inside the trailer. Some manufacturers might integrate the switch into the trailer’s main electrical panel.
However, the exact location will vary depending on the make, model, and year of your travel trailer.
Locating the Battery Switch: A Step-by-Step Guide
Before attempting to locate your battery switch, always ensure the trailer’s power is turned off to prevent electrical hazards. This includes disconnecting from any external power source and turning off any internal switches.
- Check the Battery Compartment: Most often, the battery switch is located near the batteries themselves, usually in a compartment beneath the trailer. This compartment is typically accessed via an exterior door or hatch, often near the tongue or rear of the trailer.
- Inspect Interior Compartments: If you can’t find it near the batteries, check any interior storage compartments or bays, particularly those near the main electrical panel. Some manufacturers might choose to place the switch inside for easier access during inclement weather.
- Examine the Electrical Panel: The battery switch might be integrated into the main electrical panel itself. This panel usually contains circuit breakers and fuses, and is often located inside the trailer near the entry door.
- Consult Your Owner’s Manual: Your travel trailer’s owner’s manual should have a diagram or section dedicated to the location of the battery switch and other essential components. This is the most reliable resource for pinpointing the exact location.
- Seek Professional Assistance: If you’ve exhausted all other options, contacting your RV dealer or a qualified RV technician is recommended. They can help identify the switch’s location and provide any necessary assistance.
Troubleshooting Common Battery Switch Issues: Battery Switch On Travel Trailer Function
Dealing with a faulty battery switch in your travel trailer can be frustrating, leaving you without power when you need it most. Fortunately, many common problems are easily diagnosed and fixed with some basic troubleshooting. This section will guide you through identifying and resolving these issues. Understanding your battery switch is key to preventing future problems and enjoying uninterrupted power on your adventures.
So, you’re prepping for your next adventure in your travel trailer? First things first: understand your power! Check out this guide on the battery switch on travel trailer function to avoid any dead-battery surprises. Once you’ve got that sorted, think about setting up your entertainment; a killer audiophile travel setup can really elevate the whole experience.
Seriously, good sound makes all the difference on the road!
No Power to the Trailer
This is the most common issue. The problem could lie within the switch itself, the battery, or the wiring. Let’s systematically check each component.
- Check the Battery: First, verify your battery is charged and connected correctly. Use a multimeter to check the battery voltage. It should read around 12.6V for a fully charged lead-acid battery. If the voltage is low, charge the battery. If the voltage is 0V, the battery may be dead or have a connection problem.
- Inspect the Wiring: Carefully examine all wiring connections between the battery, the battery switch, and the trailer’s electrical system. Look for loose connections, corrosion, or broken wires. Tighten any loose connections and clean any corrosion using a wire brush and baking soda solution.
- Test the Battery Switch: Use a multimeter to test the continuity of the switch. Set your multimeter to the resistance setting (Ohms). Place one probe on each terminal of the switch. If the switch is closed (ON position), you should get a reading close to zero. If you get an infinite reading (OL), the switch is open or faulty.
- Verify Switch Operation: With the multimeter still set to resistance, switch the battery switch to the OFF position. You should now receive an infinite reading (OL). This confirms the switch is working mechanically.
If you have power to the battery but not to the trailer, the problem likely lies in the switch or the wiring between the switch and the trailer’s electrical system. A visual inspection is crucial.
Incorrect Switching Behavior
Sometimes the switch might seem to work, but power isn’t consistently delivered to the intended circuits. This could be due to internal switch failure or wiring problems.
- Check the Switch Connections: Inspect the wiring connections at the switch itself, ensuring they are secure and free from corrosion. A loose connection can cause intermittent power.
- Test Individual Circuits: If your switch controls multiple circuits (e.g., house batteries, auxiliary batteries), test each circuit individually using the multimeter to isolate the faulty one. Check voltage at each circuit’s breaker or fuse.
- Advanced Testing: If the issue persists, use a multimeter to trace the wiring from the switch to the various circuits to identify any breaks or short circuits. This requires some basic electrical knowledge and may necessitate seeking professional assistance.
If the switch appears to operate but the power distribution is inconsistent, this points to either faulty internal switch components or wiring issues within the circuit. Systematic testing is essential.
Testing Battery Switch Functionality with a Multimeter
To test the switch itself, set your multimeter to the ohms setting. Place one probe on each terminal of the switch. When the switch is in the ON position, you should get a near-zero reading, indicating continuity. In the OFF position, you should get an infinite reading (OL), indicating the circuit is open. A reading that doesn’t match this suggests a faulty switch.
Battery Switch Maintenance and Upkeep
Keeping your travel trailer’s battery switch in top condition is crucial for reliable power and preventing costly repairs down the road. Regular maintenance ensures your batteries are properly connected and protected, maximizing their lifespan and preventing unexpected power outages while you’re enjoying your adventures. Neglecting maintenance can lead to corrosion, poor connections, and even complete battery switch failure, leaving you stranded without power.A preventative maintenance schedule will help keep your battery switch functioning smoothly.
This involves both regular inspections and occasional cleaning. Consistent attention to detail is key to avoiding more significant issues.
Preventative Maintenance Schedule
A simple schedule ensures you’re on top of things. Consider a visual inspection every time you prepare your trailer for a trip and a more thorough cleaning and inspection at least twice a year, or more frequently if you live in a humid climate or use your trailer extensively. Prior to any extended storage period, a thorough cleaning and inspection is highly recommended.
Cleaning and Inspection Procedures
Before starting any work, always disconnect the negative battery cable to prevent accidental shorts. This is a crucial safety precaution.First, visually inspect the switch for any signs of corrosion, loose connections, or damage. Look closely at the terminals and the switch housing for any signs of rust, white powdery deposits (corrosion), or physical damage. If you see corrosion, that area will need cleaning.
Pay close attention to the area where the cables connect to the switch terminals. Loose connections can lead to arcing and damage to the switch.Next, carefully clean the terminals and connections using a wire brush or sandpaper. Remove any corrosion build-up thoroughly. For stubborn corrosion, a baking soda paste (baking soda mixed with water) can be effective.
So, you’re prepping for your next adventure in your travel trailer? First things first: understanding your battery switch on travel trailer function is crucial for avoiding dead batteries and frustration. Once you’ve got that sorted, you can focus on the fun stuff, like setting up your entertainment. Check out this guide on creating an amazing audiophile travel aetup for those long nights under the stars.
Seriously, good sound makes all the difference on a trip!
Apply the paste, let it sit for a few minutes, then scrub with a brush and rinse with clean water. Allow everything to dry completely before reconnecting the cables. After cleaning, re-tighten all connections, ensuring a secure fit. Avoid over-tightening which could damage the terminals.Finally, inspect the switch’s mechanical operation. Ensure the switch moves freely and makes a positive connection in both the “on” and “off” positions.
If the switch feels stiff or binding, lubrication might be necessary. Consult your switch’s manual for recommended lubricant types. Avoid using WD-40 as it can attract dirt and dust.
Importance of Regular Inspection and Consequences of Neglect
Regular inspection of your battery switch is vital for preventing problems before they become major headaches. Corrosion can significantly impede current flow, leading to reduced battery performance and even overheating. Loose connections can cause arcing, which can damage the switch and even pose a fire hazard. Ignoring these issues can result in a complete battery switch failure, leaving you without power for lights, appliances, or even your trailer’s safety systems.
In short, preventative maintenance is a small investment of time that can save you significant trouble and expense in the long run.
Battery Switch and Electrical System Integration

The battery switch is a crucial component in your travel trailer’s electrical system, acting as the central control for your house batteries. Understanding its interaction with other parts is key to preventing electrical problems and ensuring reliable power. This section details how the switch manages power flow to and from various systems within your RV.Your battery switch doesn’t operate in isolation; it’s deeply integrated with other essential components like the converter, inverter, and your trailer’s various electrical loads (lights, appliances, etc.).
It’s essentially a gatekeeper, controlling the flow of DC power from your batteries to these systems. Properly understanding these interactions will help you diagnose problems and maintain your RV’s electrical system.
Converter Interaction, Battery switch on travel trailer function
The converter transforms AC power from your campsite hookup or generator into DC power to charge your house batteries. The battery switch allows you to disconnect the batteries from the converter when not needed, preventing overcharging or potential damage. With the switch OFF, the converter will still receive AC power but won’t charge the batteries. In this configuration, the converter might still power some low-voltage DC circuits designed to operate independently of the house batteries.
Conversely, with the switch ON, the converter can charge the batteries and provide power to the loads connected to the house battery system.
Inverter Interaction
The inverter converts DC power from your house batteries into AC power to run appliances that require AC, like microwaves or certain air conditioners. The battery switch controls the flow of DC power to the inverter. When the switch is OFF, the inverter is powerless, regardless of whether the inverter itself is switched on. When the switch is ON, the inverter can draw power from the batteries to generate AC power.
Overloading the inverter when the switch is ON can lead to battery drain or damage to the inverter.
Power Distribution Management
The battery switch is the primary means of managing power distribution from your house batteries. In the “OFF” position, it completely isolates the batteries, preventing accidental drain or discharge. This is crucial for long-term storage or when you’re not using the trailer for extended periods. In the “ON” position, the switch connects the batteries to the rest of the 12V DC system in your RV, allowing power to flow to lights, water pumps, and other DC appliances.
Some switches also offer a “START” position, which connects the batteries solely to the starting circuit for the trailer’s engine (if equipped).
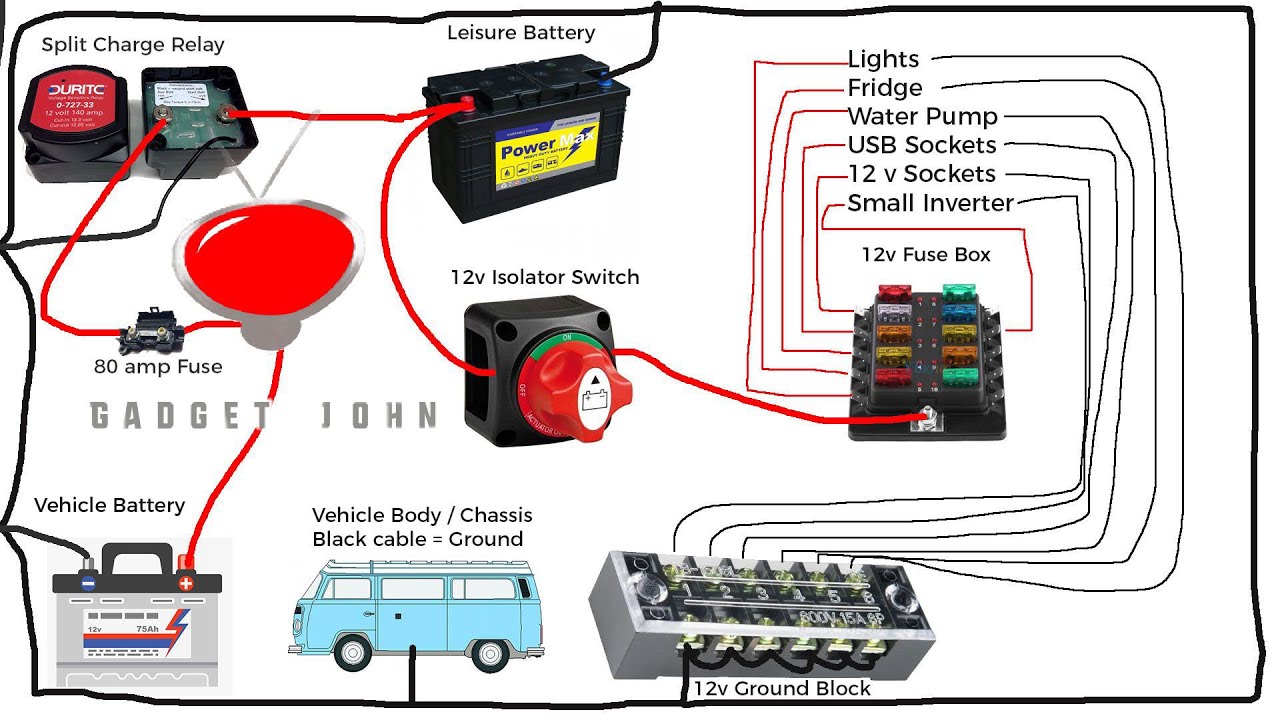
Wiring Diagram Comparisons
Different battery switch configurations result in varying wiring diagrams. A simple single-battery switch will show a straightforward connection between the batteries and the main DC bus. A more complex dual-battery switch with a combined start/house configuration will display multiple paths for power flow, potentially including a diode isolator to prevent backfeeding. A diagram for a simple single-battery switch would show a single line from the battery’s positive terminal, through the switch, to the main DC bus.
A dual-battery switch diagram would be more complex, illustrating separate paths for each battery and potentially including a combiner for parallel operation. The precise details depend on the manufacturer and the specific features of the switch. Consult your RV’s wiring diagram for a detailed representation of your specific setup.
Mastering your travel trailer’s battery switch is a simple yet powerful way to enhance your RV experience. By understanding its function, performing regular maintenance, and knowing how to troubleshoot common problems, you’ll ensure reliable power and prevent costly repairs. Remember, a little preventative care goes a long way in keeping your adventures on the road running smoothly. So, grab your multimeter, familiarize yourself with your switch, and hit the road with confidence!
Question Bank
What type of multimeter do I need to test my battery switch?
A basic multimeter with DC voltage and continuity testing capabilities is sufficient.
My battery switch is completely unresponsive. What should I check first?
Check your fuses and circuit breakers first. A blown fuse or tripped breaker could be the culprit.
How often should I inspect my battery switch?
Inspect your battery switch at least once a year or before each extended trip, paying attention to corrosion and loose connections.
Can I use a battery switch to charge both batteries simultaneously?
It depends on the type of switch. Some allow parallel charging, while others only allow one battery to be charged at a time. Consult your switch’s manual.
